Thursday, June 30, 2011

Capes for Your Super Kids

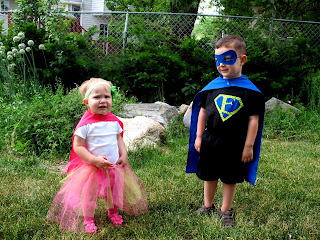
I have two of the best kids ever! I know that every mom feels the same way about their own kids, and that's great too. But I just love my kids. They are always keeping me entertained and they both try so hard to help out, especially Elijah. He's always been my little "big" helper. He even helps to chase his little sister around and tries to mind her for me and helps to contain her. It's such a crack up to see them together. So, like I said before, I know that every mom thinks her kids are the best and are really super, so why not make them a cape for them to show off to the rest of the world how super they really are? :)

Elijah always comes up to me and asks me to tie his blanket around his neck so he can have a cape and pretends to be a super hero, so I have been wanting to make him a cape for awhile now, I just haven't gotten around to it. Luckily though, my sister-in-law threw her son a really cute and fun superhero/Batman party and the kids were invited to dress up too. We just moved so I don't have access to my sewing machine right now but I wanted to make the kids' costumes. Since capes are easy to make and pretty much just a bunch of straight lines, I bought heat and bond hem tape and it worked like a charm. I hand sewed on their logos to the back of their capes and onto a shirt for Elijah. Elijah LOVES his new cape and mask. He has so much fun dressing up in his costume and loves being a superhero. He's such my super little guy!


for the capes:
http://floatingworld.typepad.com/superhero.pdf
http://pukingpastilles.com/?p=57 (this one is reversible)
http://thegoodlifebyerin.blogspot.com/2011/01/superhero-capes.html
for the mask:
http://uklassinus.blogspot.com/2008/12/2-down-1-to-go-and-superhero-mask.html

Monday, June 20, 2011

Bento Box Lunches

So this isn't something I'm actually doing right now, but I started getting into this and wanted to share. I went to the Japanese food store the other day and I bought a cute bento box for Elijah so that I could start packing him lunches. I remember when I was five and went to school in Japan and my grandparent's housekeeper would pack me and my younger brother bento box lunches for us everyday. I loved them when I was young. Nowadays, you can turn them into a piece of art (which I love). I already cut his sandwiches into fun shapes using cookie cutters that I have lying around the house, but I thought that this would be something fun for him and when he does start school, something nice that would add to his day and let him know I love him and was thinking about him. Plus, I think this would help me actually want to pack lunches for him everyday (something I need to be better at).

So here are a few of the supplies I bought at the Japanese food store.
Here's some pictures to give a visual of the ridiculously cuteness and creativity of some bento boxes. (I didn't do these but hopefully I'll give an update of my own if I can learn how to do things like this)


I also went online and purchased a few books that give recipes and tutorials of how to make the character bento boxes (kyaraben). And you don't have to do just Japanese food you can do all sorts of different types of food.

"Cute Yummy Time: 70 Recipes for the Cutest Food You'll Ever Eat"

"Yum-Yum Bento Box"

"Funky Lunch: Happy Food for Happy Children"

I also found these blogs that are solely for bento boxes.
yum yum bento
 cloud 9 food
 just bento
 lunch in a box
 my bentolicious
 bento for beginners
 adventures in bentomaking
another lunch

Anyways, I thought I would share in case anyone else wanted to have fun with lunches :)

Saturday, June 4, 2011

Toddler Flapper Ruffle Dress

Since I threw my husband his 1920's party, I've been a little obsessed with flapper dresses and with feathers. I had the left over fabric from the photo booth from his party, so I thought it'd only be appropriate to turn it into a flapper inspired dress for Chloe. I just made it up as I went, but later I found a tutorial how to make the bottom of the skirt if you want it.
I took an extra black shirt that no one was using and cut out the pattern for the dress. (The fabric was jersey, and I didn't take into consideration that it stretches, so if you use jersey fabric maybe trace it a little smaller than you normally would) My pattern was pretty much a rectangle of the width and length that I wanted the dress, then I cut out holes for the head and arms. I stitched them together and had the base of my dress.

For this next part you can look at this tutorial for better instructions and pictures. I took the black and white fabric and cut it into strips 6" wide and then sewed them together, so I would have 3" wide strips. I pulled the threads to gather the strips to get the ruffle look. I then sewed the ruffles onto the base of the dress.

After sewing the ruffles onto the dress, I cut another thin strip of white fabric (about 2" wide) the width of the dress. I sewed the fabric over the first ruffle to hide the raw edges. I thought that the dress still needed a little bit more, so I decided to sew on a few fabric flowers to the front of the dress. You can look at this previous tutorial to see how to make the ruffled flowers and you can use this tutorial to make the big fabric flower on top. (A way to make the fabric flower easier and faster is to hot glue the petals on instead of sewing each one)
Here's a better close up of the big flower
To complete the look, I made a feather headband to go with the dress. I just bought a bag of white feathers and hot glued them together and stuck them on a clip that I had wrapped with white ribbon. I then glued on an antique looking broach to cover the ends of the feathers. I personally like to make clips for headbands, that way I can just interchange them to match different outfits, but feel free to glue the feathers directly onto the headband instead of a clip. But Chloe LOVES this headband, mainly because the feathers are so soft.

Here's the look put together