Monday, October 31, 2011

Pumpkin Cranberry Bread

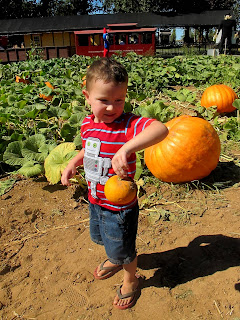
You should by now know I'm obsessed with pumpkin, right? I was really excited to find out this year that so is Elijah. It all started with our annual trip to the pumpkin patch and he got to pick out one small pumpkin to take home. He LOVED that little pumpkin! It turned into his pet pumpkin that he would take everywhere and do everything with. Sadly because of being carried (and dropped a few times) everywhere it wasn't a young fresh pumpkin for very long and he had to leave it behind in California.
Elijah and his "pet" pumpkin

Shortly after returning to Utah I decided it was time to make my pumpkin cranberry bread. This is something that I look forward to every year and have to force myself to wait to make until October (that and for fresh cranberries to come into season). When Elijah heard that I was making pumpkin bread he told me flat out he didn't want it. Since I knew of his love of pumpkins and since he never really refuses food of any sort, I was a little confused by his exclaim. I later figured out that he didn't think pumpkins should be turned into food since they were pets. We don't eat our pets! Well, as soon as I took the loaves out of the oven, he already changed his mind. After eating this bread it completely changed his mind about pumpkins being food. In fact, both him and Chloe demolished an entire loaf on their own and for the rest of the week I was woken up by Elijah asking for pumpkin bread for breakfast. He now loves anything pumpkin!

I hope you enjoy this as much as we do. This is my own recipe and one of our fall favorites!

Pumpkin Cranberry Bread
1 c pumpkin puree
1 c oil
1 c water
4 eggs
2 c sugar
1 c brown sugar
3 c flour
1 teaspoon each cinnomon, cloves and nutmeg
1 1/2 teaspoons baking powder
2 teaspoons baking soda
1 teaspoon salt
zest from one orange
1 1/2-2 c fresh cranberries
2 c pecans (or walnuts) optional too

1 tablespoon each brown sugar and sugar for tops of loaves

Preheat oven to 350. Prep 3, 8x4x2 1/2" loaf pans by greasing the sides with butter.

In a large bowl, combine pumpkin, oil, water and eggs. Add sugars. Mix well. Add 1 cup of flour, spices and zest to pumpkin mixture. Mix well. Add remaining flour one cup at a time. Mix the batter until smooth. Fold in cranberries and pecans.

Pour batter into greased loaf pans. Sprinkle remaining sugars over the tops of the loaves. Bake for 45-60 minutes or until toothpick inserted into the center of the loaf comes clean.

Saturday, October 29, 2011

Pumpkin Spice Cupcakes

 One of my favorite fall treats is pumpkin cupcakes. My mother-in-law bought really cute witch picks for a  a Witches Tea Party and asked me if I would make cupcakes to go along with them, and with my obsession of pumpkin I was already planning on making these cupcakes, but this gave me an excuse to actually do it. Unfortunately, my recipes are still packed away in boxes so I had to hunt out another recipe for pumpkin cake to use this year. I whipped up some new recipes for frostings as well and all in all it turned out one wickedly delicious cupcake.


I found this recipe from Annie's Eats and was pretty happy with it. I did make a few changes so I'll post my adapted recipe if you want to use it.

2 2/3 c flour
2 teaspoons baking soda
2 teaspoons baking powder
1/2 teaspoon nutmeg
1/2 teaspoon cloves
1/4 teaspoon ground ginger
1/4 teaspoon allspice
1 teaspoon salt
1 (15 oz.) can pumpkin puree
1/2 c oil
1/2 c applesauce
4 large eggs

To make the cupcakes, preheat the oven to 350°F.  Line cupcake pans with paper liners.  In a medium bowl, sift together the flour, baking soda, baking powder, and spices.  Set aside.  In the bowl of an electric mixer, blend together the pumpkin, granulated sugar, brown sugar, applesauce and oil. Add the eggs one at a time, beating well after each addition.  With the mixture on low speed, add the flour mixture in two additions, mixing just until incorporated.

Fill the cupcake liners about three-quarters full.  Bake until the cupcakes are golden and a toothpick inserted into the center comes out clean, 18-20 minutes.  Transfer the pans to a wire rack and let cool for 10 minutes, then remove the cupcakes from the pans and let cool completely.

This time I decided to fill my cupcakes with a white chocolate, cream cheese, peach, whipped cream. (That's a mouthful, but a yummy one) You'll also have left overs of this to enjoy later.

4 oz white chocolate, melted
4 oz cream cheese, softened
1 c whipping cream, chilled
3/4 c powdered sugar
2 (15 oz) can of peaches, chunks (fresh and frozen works well too) and drained completely

In a large mixing bowl, whip cream cheese then add melted white chocolate and continue to beat until fully incorporated and creamy. In a separate bowl, beat whipping cream until soft peaks form add sugar and continue to beat. Combine whipped cream in with cream cheese mixture, and beat until fully incorporated. Stir in peaches.

To fill cupcakes, I cut a circle (or you can use a small circle cutter) in the center of the cupcake. Spoon in filling and replace the tops of the cupcakes.

I should say that I really do enjoy cream cheese, but haven't been a big fan of cream cheese frosting so I always alter it to suit my own preferences. So for the frosting I made a white chocolate cream cheese frosting and made ruffles to look like the pettiskirt of the witch.

5 oz. white chocolate, melted
12 oz. cream cheese
5 tablespoons unsalted butter
1/2 teaspoon cinnamon
zest of orange

Whip the cream cheese and butter in a large mixer until creamy, add white chocolate and continue to cream together. Add cinnamon and orange zest and beat until fully incorporated.

Hope you enjoy these as much as I did!
DIY Feather Skirt

My in laws have a tradition of a girls only Witches Tea Party for Halloween and this year we were actually around to go. I didn't realize I had to actually have a costume until a couple of weeks prior to the party. I've been so busy that I didn't really have time to put one together but I was working on this skirt for Chloe's Halloween costume. Elijah wanted to be a giraffe so I was going to make Chloe an ostrich costume. I found this tutorial for a feather skirt on Love Meagan that I was going to use for the base of her costume. With this Witches Tea Party though I remembered that I already had a witch costume for Chloe that was a hand me down from my 4 year old sister. I already bought everything to make her costume so I decided to alter it and make the skirt for me. Actually, I found a witch's hat at Joanne's for $5 and it inspired the rest of my costume. I only spent $15 making the skirt too, because I used 50% off coupons for the feather boas and the fabric was also 50%. I think I'm going to turn my skirt into a skirt for Chloe still. I can get her to wear it, but really, when am I going to ever wear this again? lol

Here's a side view so you can get a better view of the skirt
(the hat is purple not blue, hence the purple hair and eyelashes to match)

And here is both of us in our witches outfits

Friday, October 7, 2011

Guest Blogger: Cute Halloween Art with Alanna

Hi, Everyone! Today is the first Friday of the month and I'm still keeping up with my guest blogger Friday. Today's guest blogger is my friend, Alanna. She is always doing some sort of cute craft or project so I knew she would have something cute for Halloween. I hope you all enjoy this craft. I know I'm going to :)

Hello All,

I'm Alanna and stay at home mom of 2 oh-so-cute kids one boy and one girl. I enjoy doing crafts, reading, and playing outside. I dislike doing dishes, cleaning off the desk, and making dinner every night (seriously how often do we really need to eat?)

I am happy to be here on Joyous Love creations.

To help welcome Fall and October I have a Halloween craft. I originally saw the idea on


Where she did a button egg for Easter.

I also saw another style made out of fabric. I loved the 3D look of the buttons but I loved the patterns of the fabric. I also had a hard time finding enough buttons of the same color and since I am too impatient to wait and order I decided I would use both fabric and buttons. I think they turned out pretty good.

Materials needed:
Burlap
Buttons in color of your choosing
Fabric of your choosing. I like to have 3-4 different patterns in addition to the buttons. I bought those dollar squares at Walmart you need very very little of each fabric pattern.
Frames
Elmer glue (auntielolo used super glue but I couldn't be mine to stick with it).
Scissors
Paint for frames
Thread of matching color.

Instructions:
  1. Choose the shape you want to make. Then search Google for an outline of the image.
  2. Cut burlap to the size you need to fit in your frame. About an inch bigger than the back piece that pops out when you insert your picture.
  3. Place image on burlap and trace it with pen.
  4. Cut fabric into small circles. The largest circle was about a quarter sized.
  5. Fill in the shape with your buttons and fabric circles
  6. Use the Elmers glue to secure the buttons and fabric to the burlap. Make sure you put a piece of paper under the burlap so the glue doesn't ooze through onto something nice.
  7. Once dry use the thread to sew on each button and fabric circle
  8. Remove glass from frame and paint the frame the color of your choosing. Let Dry.
  9. Insert button image and use frame back to secure. Hang picture


Some other ideas:
For Thanksgiving: an acorn or a turkey I can't decide if I would do a fabric body and all button feathers or the other way around.
For Christmas I may try a Tree, Star and Snowman combo
If you do not like the burlap look you can try another stiff fabric or use another fabric with a light interfacing ironed on the back. I think a blue fabric with snow flakes would be cute to use behind the snowman.