Today, I am really excited to introduce my first guest blogger, Mea. She is one of many women I know who are skilled in bringing beauty, fun, craftiness, love, talent and is an amazing mother. She is always doing cute things for her house. I love all of her crafts! Thanks again Mea for sharing your latest craft.
I think her project is the perfect project to welcome everyone to the new site too. Enjoy!
Hello there Joy {Love} Create readers! I am so excited to be here today, and I'm honored that Joyce invited me to share a little bit of my crafty craziness. I am a hopeless craft addict with a blog called oops-a-daisy creations. I blog about everything from crafts, repurposing furniture, decorating, food, friends, and family. Pretty much everything that makes my world go round!
Today I am going to share with you a project I like to call My Freaking Awesome Paper Cone Wreath. I broke the number one cardinal rule in blogging and forgot to take pictures along the way, so I am going to try and give you a step by step tutorial the best I can. I did find a few pictures from another blog just so you get the idea. I'm sure this wreath has been around the blogging block a dozen times {so dirty}, but I like this one the best! So here goes:
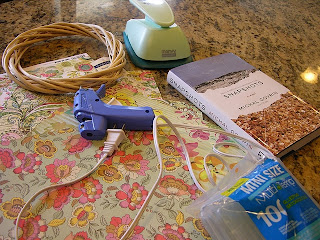
First, gather your supplies.
You will want:
-5 or 6 double sided scrapbook papers. I picked 5 different papers from this wreath, but you could do 5 of the same if you wanted.
 -Printed pages. For this wreath I used a book I bought at the dollar store. But just about any printed pages would work... copy pages... old text book... whatever. Just think about the color of the pages before you pick them. Some pages are whiter than others.
- A 3 inch scalloped paper punch.
-A hot glue gun and about 10 to 15 sticks of glue.
- A wreath base.
I like to buy my wreath base at the dollar store, but I actually had a 12" wreath base on hand. Sa-weet!! I also didn't want to shell out $25 for a punch, so I borrowed one from a friend. I had pretty much everything else on hand, so this project literally cost me about $3 {for 3 sheets of double-sided scrapbook paper}.
Now lets move on to the paper part of this. Use the punch to cut out your circles.
You should be able to cut 2 pieces of the thick scrapbook paper at a time. And don't forget to get those middle punches too.
For the book pages you should be able to punch them out 4 pages at a time. First go through your book and tear pages in sets of 4. You are going to want a lot of pages.
Now using your glue gun start making cones.
You will want to make cones of all different widths and try to make sure the cone it closed at the bottom. They look better on the wreath if they are closed at the bottom.
I like to make quite a few cones before I start gluing them on. Start out by working your way around the top of the wreath.
Once you get all the way around the top, start filling in the side. I like to do the middle first. When I am gluing the cones on top I like to put glue at the base of the cone, but once I am doing the sides I put glue on the sides and sometimes on the base.
Be sure and fill it all in. It helps to hold the wreath up to the light, and turn it on it's side and upside down, to see the naked spots. Then fill them in with extra cones. I made some super skinny cones just for this reason.
Then I made the little welcome sign. I cut them out of leftover pieces of scrapbook paper.
And now for the end result. Drum roll please.....
Isn't it lovely? I'm pretty much in love with it.
This was such a fun project. Kinda time consuming, but definitely worth it!
Thank you, sweet Joyce, for having me! I'm pretty certain everyone would agree with me that we all love your blog. Thanks for all the fun ideas! You are one crafty mama.
Loves! Mea


This wreath sounds like such a fun project!
ReplyDelete