Tuesday, August 23, 2011

Ice Cream Party

Since we went back to California to visit, I decided to throw a little ice cream party for Elijah and a few of his friends. I thought it would be a fun way to get together for a nice hot summer play date. I also think I just wanted any excuse to be able to throw a little party and I had so much fun decorating and finding fun things for it. I didn't get to decorate everything that I wanted to but I got the food done, so that was really what counts!

I only used two flavors of ice cream: chocolate and vanilla but added some fun garnishes.

I also made some fruit sauces to go with the ice cream. I got the idea from BHG and used some of their recipes too. They featured a lovely spread for a pie-a-la-mode ice cream social. Additionally, I added pie crust cookies and just rolled them in cinnamon and sugar to go with the fruit sauces.

The Gummy Bears and Sprinkles were a big hit with all of the kids.

 You can get the peach recipe here and the chocolate-cherry recipe here.


Not that we needed any more sweets, but I've been wanting to make these all summer, so I also made rootbeer float cupcake ice cream cones. For the step by step how to and free printables go here and for cupcake recipes go here and here. (I really wasn't a big fan of the rootbeer buttercream recipe, so I'll use a different recipe next time)

It was also a water party so I had the backyard sprinklers going and bought spray bottles and bubbles for the kids to play with and to send home as party favors. They had a blast with them!  

It was so much fun getting Elijah's friends together and just watching them have so much fun and to just enjoy the day (and of course some yummy ice cream). I also wanted to add a special thank you to my friend, Ashley of Yve Louden Photography for taking pictures of the party!

Sunday, August 14, 2011

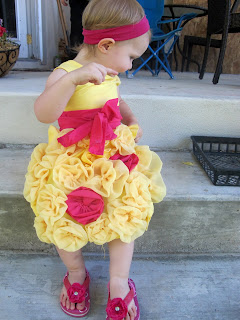
Flower Dress

 I'm really excited about this dress that I just made for Chloe. I've been wanting to make this dress for a few months now and finally got around to do it. I first got the idea for this dress when I went wedding gown shopping with a friend. I saw a gorgeous dress and fell in love with it. It's not one I would wear but loved the idea of it, so of course had to make a dress inspired by it for Chloe.

  I'm still working on it though. Appliqueing all of the flowers is taking some time and I wanted it for Chloe to wear on Sunday. Even as it is I think its great. It's also really easy to make. I made the dress and appliqued the front of the dress all in one night. (By the way, the dress is yellow and pink... the pink looks a little red in the photo)


For the top of the dress I just used one of Chloe's dresses to make a pattern and find dimensions. (Make sure to leave enough around to make a seam with!) To make the bottom of the dress I started by making a quick and simple skirt without making a casing for the elastic to go through. Instead of where the casing would be on top, I used the longest stitch on my sewing machine and pulled the thread so it would gather. I then sewed the skirt onto the top of the dress. (One day I might try to do an actual tutorial with step by step pictures but if you can't tell I'm not that great at explaining things) For the flowers I just made them out of chiffon and used the same technique that I used on her other dresses. One thing I have to do is install a zipper in the back. The dress is a little tight on Chloe (I used an old dress for her pattern and didn't realize she grew out of it...oops!) I haven't used a zipper before so that will be the new thing to learn how to do on this dress for me. But I found this tutorial on how to install a zipper, so hopefully it will work. :)


But I love this dress and I think its so fun and flirty and is a great summer dress.

Saturday, August 13, 2011

Back To School Printables

This is a very big year for us! Elijah is starting preschool this year. I can't believe he's already old enough to start going to school. His class doesn't start until next month so I have some time to emotionally prepare for it still, but since most kids start school this month, I thought I would post this now. I've been finding things online for back to school (can you tell that I'm excited for him? lol) and I thought these were cute ideas.

I know that I'll be taking lots of pictures of Elijah on his first day of school and I thought this was a cute idea from How Does She. Here are some printables to categorize each year's first day of school.

If you really want to go all out you can make this adorable chalk board cut out.

I also love the idea of sending notes with the kids to school and here are some cute cards and jokes you can use too.

And I'm sure every kid wants to bring his/her teacher a little gift at some point, so here's a card and printable you can use.

Along with a few sites for more teacher love:
http://thirtyhandmadedays.com/category/back-to-school/page/2/
http://www.lilluna.com/2011/08/holiday-101-thursday-back-to-school.html
http://anythingbutperfect.com/freebies/TeacherAppFlagsABP.pdf

Saturday, August 6, 2011

Drive In Movies at Home

 Elijah has been recently obsessed with the movie Cars. (Actually, it was the first movie he ever sat through the entire thing when it first came out) He wants Cars toys and books and clothes... pretty much anything that has Lightening Mcqueen or Mater on it. I thought it would be fun to take him to see Cars 2 for a treat, but first, I wanted to watch the first movie to get him excited for the second (not that its necessary). I thought that I'd take the opportunity to make it an official movie night. But what better way to have fun with cars then to make your own out of a cardboard box and use it to watch movies in and drive around the living room with later?

I've been wanting to do this since before I was married and have held onto the project for a good five years now. So little to say, I was really excited to do this with the kids. Elijah was just as excited and he had a blast doing this too. He picked out all of the colors and even wanted to add the "number E on it for Elijah". He helped design Chloe's too. I just used stuff I had around the house (good thing we just moved so I have a TON of boxes) and we had a great time with it. I would probably paint the box next time (I just couldn't get to my paints) because the paper rips too easily with a toddler around. Obviously, if your kids are older/bigger you can do this with bigger/ longer boxes. You can even use one long box to fit in all the kids and not different boxes. This is such a fun and easy project and one that the kids will have so much fun with for hours and hours!

side not to self: mirrors face toward the driver not out :P
 And what's a movie without a little popcorn?

Thursday, August 4, 2011

A Ruffled Cake

I did this awhile ago, but someone asked how to do it so I thought I would post it here too, in case anyone else wants to know. This is so easy to do and the result is beautiful. The first time I saw a picture of a cake like this I was obsessed with how to do it. (By now everyone should know how much I love ruffles) I found the video how-to on the My Sweet and Saucy blog. I love all of their stuff; it's all so pretty and looks so yummy! So, of course, they would be the ones to also feature the how-to video on how to do this ruffled cake.

I also did the same for cupcakes (the picture's not that great, sorry)
Enjoy!

Wednesday, August 3, 2011

The Best Brownies

It all started with the raspberries. A few days after moving, we found this little farm off the side of the road with the most beautiful and gigantic raspberries. We found it by accident and so we have no idea where to find it again. :( As soon as we tasted the ripe, plump, sweet and juicy raspberries, I immediately thought of this brownie recipe that I had seen on Desserts for Breakfast's blog. I've been wanting to make them for awhile but hadn't had the opportunity. This just seemed like the perfect welcome after our move.

I actually made these brownies a month ago and I still think about them. This is by far the best homemade brownie recipe that I have tried. They are just so gooey and rich and so satisfying. It was hard not to eat the entire pan by myself (I mean it would've be rude not to share or at least it'd make me look like a pig since it's a 9x13" pan). And the best thing about this brownie is that its dark chocolate. When you're craving something super chocolaty and something so delicious that will keep you content for hours after you eat it, this is what you need to make!

YUM!