When I saw this skirt, I immediately needed to make it. It's actually called a "Bustle Skirt", but since I made mine red, it looked like rose petals. I really wish I had seen this tutorial earlier this year, because this is what I would have made for Chloe to wear on Valentine's Day. I love how girlie and romantic it is. I made it a little bit bigger, so she would have it longer to wear ... maybe even for next Valentine's Day : )
This is really easy to make, but it is time consuming. I also decided to make my circles smaller than the ones in the tutorial since I was making the skirt for my 15 month old daughter, and theirs was for a 4 year old. I would recommend just doing the larger circle, it really took a lot more time to cutout and sew all of the circles. But this skirt only took me a few hours to do.
But I LOVE this skirt! I love to watch her run in it, because it just has so much movement from the "petals" all over the skirt. Here's a picture of the skirt worn by my little model :)
Sunday, May 15, 2011
Rose Petal Skirt
Monday, May 9, 2011
A Ruffled Pillow Case Play Dress
Sorry if you guys are getting sick of all the ruffle dresses lately, but I said earlier that I've been obsessed with them lately. I found this tutorial for this dress. It originally was made out of a pillow case. I love that! Here's my version of the pillow case ruffle dress.
And just because here's a close up of the flower :)
Monday, April 25, 2011
A ruffled dress and bow tie
Lately, I have been checking out a lot of different sites for toddler dresses. With Easter coming up, and my husband not wanting me to buy outfits for the kids, I decided I would try my best to make them. Right now I'm obsessed with all of the ridiculously cute ruffled dresses that are everywhere, so of course that's what I chose to make for Chloe's dress. This is my first time making a dress too, so I wanted something that looked easy enough for a beginner. I don't know if that was this dress, but it made all of the other dresses I made after seem really easy. (Those tutorials will be shown in a different post). But I discovered that toddler dresses are so easy and cost effective!
I followed these directions of how to piece the dress together, but I made mine differently since I used left over fabric that I had lying around the house. If you want to do what I did, just take the fabric and fold it in half. Take a dress that is about the size you want to make yours and cut around it keeping a 1/4 in around to sew it together. Or cut a rectangle of the size you want your dress and cut out arm holes and a neck line, then sew them together. (In a later post I'll have a tutorial that will show how to do this for a better visual)
Of course I also had to make a headband to go with her dress. As I was looking for tutorials, I stumbled across this website and instantly fell in love Snazzie Drawers. The best thing about it is that she sells her patterns! And if you don't want to make your own, she has her own etsy store. I used her headbands as my inspiration (I just copied hers). (To make the flowers for both the dress and headband, you can use this tutorial.)
For my son, I really wanted to make him a suit, but alas, I ran out of time (hopefully, that will be a later post). I did, however, make him a bow tie. I wanted it to match Chloe's dress a little, so used the same blue fabric as her flowers. Also, to make this A LOT easier, I used a white elastic for the band, so he can put it on or take it off himself. He loves his bow tie, but didn't let me take a picture of him wearing it.
Wednesday, March 9, 2011
1920's Black and White Party
My hubby turned 30 this year and so I decided to throw him a 1920's Black and White party to say goodbye to his 20's.It was so much fun finding things for this party. I was going between having a vintage feel or just doing black and white and finally decided on the latter, just so it'd be easier to get people to dress up.
For decorations, I did all black and white. I made black and white tissue flower pompoms using this tutorial from Martha Stewart Weddings. I hung them up around the apartment. To get in the 20's vibe, I also rented a Charlie Chaplin silent movie to project onto the wall and had jazz music playing.
I really wanted to have a "photo booth" for the party since everyone was dressing up. So I just made a curtain out of some cloth and strung it between my hallway. I bought some fun props too. You can find other fun ways (and some more hi tech ways) to set up a photo booth here. But I think the photo booth was a huge hit with everyone.
For the food table I made a fabric backdrop and then used a black table cloth with a white table skirt. I then embellished with white food trays. For the dessert table I made a serving dish from a mirror and glass vases and used glass cake stands to arrange the rest of the desserts on.
For the appetizers I wanted to do a modern take on 1920's food. Everything I looked up for this just said Italian food, so I did Italian appetizers: prociutto wrapped melon balls, mushroom and cheese crostinis, mozzarella and basil stuffed tomatoes, salmon lox, and chicken Parmesan meatballs. I made them small since we also had a dessert bar.
For the dessert bar, I made all of the food black and white. The dessert bar consisted of white cupcakes filled with raspberry buttercream and frosted with white chocolate cream cheese whipped cream, rum chocolate and pineapple buttercream chocolate cupcakes, and brownies pops dips in powdered sugar.
We also had a "Prohibition Bar." I even hired a bartender for the night to make the 'mocktails'. It was so much fun. I ritzed up the martini glasses with little black ribbon tied into bows. I also made up names for the drinks using 20's slang phrases. Guests were able to order their drinks: straight up, neat or on the rocks. Jed really went all out and took control of the "bar". He even made up his own signature drink for the night.
Everyone had fun and it was a fun night just to dress up. We did have a costume contest and everyone was able to strut their stuff down the catwalk. That was one of the best things... everyone has some great catwalks!
This was a really fun night and a great way to say goodbye to Jed's 20's
For decorations, I did all black and white. I made black and white tissue flower pompoms using this tutorial from Martha Stewart Weddings. I hung them up around the apartment. To get in the 20's vibe, I also rented a Charlie Chaplin silent movie to project onto the wall and had jazz music playing.
I really wanted to have a "photo booth" for the party since everyone was dressing up. So I just made a curtain out of some cloth and strung it between my hallway. I bought some fun props too. You can find other fun ways (and some more hi tech ways) to set up a photo booth here. But I think the photo booth was a huge hit with everyone.
For the food table I made a fabric backdrop and then used a black table cloth with a white table skirt. I then embellished with white food trays. For the dessert table I made a serving dish from a mirror and glass vases and used glass cake stands to arrange the rest of the desserts on.
For the appetizers I wanted to do a modern take on 1920's food. Everything I looked up for this just said Italian food, so I did Italian appetizers: prociutto wrapped melon balls, mushroom and cheese crostinis, mozzarella and basil stuffed tomatoes, salmon lox, and chicken Parmesan meatballs. I made them small since we also had a dessert bar.
Sorry, this was the only picture taken of the food... they went fast
Dip the Bill: Have a Drink
Everyone had fun and it was a fun night just to dress up. We did have a costume contest and everyone was able to strut their stuff down the catwalk. That was one of the best things... everyone has some great catwalks!
This was a really fun night and a great way to say goodbye to Jed's 20's
Fun with Cupcake Liners
I found this tutorial for these cute pompoms using cupcake liners. I loved them when I saw them and to make it even better, they're so easy to do. I love easy! And fast! The wreath took the longest and it only took me about 40 minutes. I didn't count how many liners I used but it was about 1 - 1 1/2 boxes of liners depending on the size of the pompoms. I was throwing a Girls Night for a friend's baby shower and was doing a cupcake bar, so I thought it'd be fun to decorate everything with cupcake liners. I also threw the party a week before Valentines Day so I kept up some of the decor (most of them I gave away to be used for the baby to be) since they're so frilly and fun.
Using the same technique I made all of these:
Plus, here's a couple more cute ideas using cupcake liners.
http://papercrave.com/how-to-make-cupcake-liner-flower-tree/
http://www.marthastewart.com/article/cupcake-paper-carnations?backto=true
Using the same technique I made all of these:
If you use a different color than white, wrap the wreath with matching ribbon underneath so you won't see any holes peeping through.
(The other lanterns were left over from Chloe's party)
My wall art and my banner says "oh so sweet"
I turned the liners inside out and right side in for this one
The look put together
http://papercrave.com/how-to-make-cupcake-liner-flower-tree/
http://www.marthastewart.com/article/cupcake-paper-carnations?backto=true
Monday, March 7, 2011
Robot Party
Elijah was obsessed with robots for awhile and wanted a robot themed party for his 3rd birthday. So I tried to find things in stores and online, and couldn't find much, that is until the day of his party... of course that'd happen. But if anyone else wants to throw a robot party here are some of my finds.


(I also had apples with the label saying "powered by apple" and chocolate milk for the "fuel")


I went to Target to get most of the supplies for the party. They were the only place I could find robot stuff. And the best part was almost all of them were in their $1 bins. (I bought the slinkies there for $0.25!) I used these as party favors.
I used this printable for Elijah's robot cutout. I spent less than $10 on his cutout and all of the kids had so much fun with it. I think it needs to be made with something heavier than styrofoam though, so the kids can't run around the house with it. lol To make the cutout I went to Home Depot and found styrofoam insulation with the foil on it (less than $5) then bought some shelf holders (less than $2 each) and just hot glued them to the base so it'd stand up. I cut a hole out using a sharp knife and painted the robot body using acrylic paints. Voila! My own cutout stand for pictures.
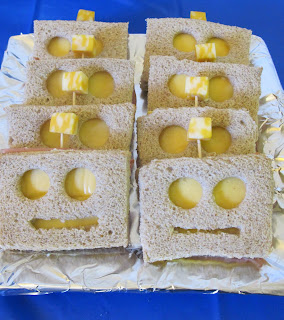
I saw some cute robot sandwiches and used the idea to make my own. Mine are a lot simpler being only ham and cheese sandwiches but the kids seemed to like them all the same, and it's not like they knew what they were missing.
I traced some gears in Illustrator and used them for the labels for Elijah's birthday banner and for the food. (I had some robots that my dad made for me using Illustrator that I was going to use to "hold" up the gears on the banner, but my printer ran out of ink and I ran out of time) I labelled the food to go with the robot theme. And I thought that these tissue pinwheels were kind of like gears (maybe just to me), but it at least added some more color and I cut out some robots and glued them to the centers.
(I also had apples with the label saying "powered by apple" and chocolate milk for the "fuel")
Elijah also likes pinwheels so I used robot paper (found at Target) and made them into pinwheels using this tutorial.
Elijah's cake was really simple to do. I still wanted to have an "educational" aspect and thought it'd be fun to do a rainbow cake. I saw this cute rainbow cake on the Whisk Kid and thought I'd try it out. I used my own recipes, but used her technique. Only the head was cake. I wrapped it in fondant and made fondant eyes. For the body, I took a box and wrapped it, then glued on the "screen", and the legs are just cans with the labels removed. See? Super simple!
For crafts, I had a robot and rocket foam kit from awhile ago that I bought at Walmart and just busted it out for the party.
Some fun activity ideas I thought of doing were to play Robot Says (same as Simon Says, but doing robot things), a robot scavenger hunt where they find things to build a robot then they put one together, and of course have them dress like a robot.
We had a robot dance party. I recorded Robot Dance A Lot on Disney and put it on for the kids to follow and it was really cute to watch all of the kids dancing and doing "the robot".
And here are some free printables: (I didn't use any of these, but wanted to)
Some robot coloring pages
robot and rocket printables
In case you want to go all out and make some paper robots, check this out.
I found these the day after his party, but really wish I had them before.
If I had the talent and time I would've tried to make these cupcakes by hello naomi
And if my husband would've let me buy these cupcake holders, I would've (and I still want them lol).
I hope this helps anyone who has a robot obsessed kid wanting a robot party. :)
Cherry Blossom Party
For Chloe's first birthday, I did a cherry blossom viewing party. I had been obsessed with a cherry blossom theme ever since I found out I was having a girl. Plus, I was able to make this party pretty affordable since I could borrow a lot of the elements I wanted. I don't think anyone's going to throw a cherry blossom party anytime soon, or if you just want to know how I did some of the things, here's some of the tutorials I used and things that I did for her party.


I made the cakes for the party and made fondant cherry blossom flowers. I found this video on how to do it. I did do mine differently, but I used hers to get the general idea. This was my first time using fondant and I think they turned out pretty decently. I tinted the fondant pink and used pink shimmer for the inside of the flowers and white shimmer for the edges. Personally, I like the rough edges of the flowers, I think they look a little more realistic than if they were perfect, but that's just me. :)
I looked up the kanji for Chloe's name and I traced it in fondant.

This cake was chocolate cherry cake filled with a lemon custard and frosted with chocolate truffle frosting.
(side note: if you haven't had lemon and chocolate you HAVE to TRY IT!)

This cake was chocolate cake filled with caramel and strawberry buttercream and covered in chocolate ganash.
(the topper was also borrowed from my friend)

I wanted more traditional Japanese food, but went with what I figured everyone would eat. I served pork tonkatsu, teriyaki chicken, rice balls, croquettes, and a cucumber salad. I even bought Japanese sodas for everyone to enjoy.
For the decorations, I borrowed a lot of it. My friend lent me her wedding kimono and the curtain, my mom let me use the emperor and empress dolls, and my brother let me borrow his samurai helmet and I also put up the picture that he drew of Chloe on the front door to greet guests with.

What I didn't borrow I made or embellished with cherry blossoms that I punched out using a cherry blossom flower punch. I bought pink and white paper lanterns then I used this tutorial from Martha Stewart for the tissue flowers on the lanterns. This might by a bit extreme, but my husband bought me cherry blossom scented oil for Christmas so I even had our apartment scented like cherry blossoms.
I decided I wanted to have cranes as part of the decor too, so I used them for the food. I folded small paper cranes for the ends of the toothpicks for the food. (I was going to make curtains of all of the cranes, but ran out of time) I also had regular sized cranes to hold the labels.
As part of the display, I wanted cherry blossom branches so I got some branches from a guy pruning his trees and they even had small buds on them which made them perfect! I glued (using tacky glue) on paper cherry blossoms that I punched out. I creased the flowers in the center so they were more 3D; I then used a gold glitter glue stick to dot "stamens" in the centers.
I made labels for all of the food and drinks and wrote everything in Japanese with the English translations underneath. To do that I just used Google translator :) For the water bottles I took off the labels and wrapped them with ribbon and glued personalized labels on instead.
I even tied the chopsticks and forks with pink ribbon. As the cable guy pointed out while I was wrapping them, "it might be a little overboard". hehe
For the thank you's I put together some Japanese candy (because if you ever get Japanese food they always give you candy with your check) and labelled them as well.
I looked up the kanji for Chloe's name and I traced it in fondant.
This cake was chocolate cherry cake filled with a lemon custard and frosted with chocolate truffle frosting.
(side note: if you haven't had lemon and chocolate you HAVE to TRY IT!)
This cake was chocolate cake filled with caramel and strawberry buttercream and covered in chocolate ganash.
(the topper was also borrowed from my friend)
People still dress up in kimonos for cherry blossom viewing parties in Japan and since we bought kimonos for everyone when we were in Japan, plus my family has quite a few extra ones, I thought it would be fun to have as many people dress up as possible. It was so much fun. Everyone really had fun dressing up too. Here's the cute birthday girl in her kimono.
I hope this helps if you want to throw you're own party. :)
Subscribe to:
Posts (Atom)