Monday, January 30, 2012

Flower Party

This year for Chloe's birthday party, I went a little simple. Not by choice but mainly because I've been a bit under the weather (or like my husband likes to say the weather's been on top of me) so I originally had a huge over the top party planned, but I think this one still turned out really cute.

The colors I chose were yellow, pink and white. I did a combination of fabric and paper flowers for decorations. I only spent about two days on the party too so it really wasn't time consuming at all. I also kept changing my mind and tried to simplify what I wanted to do. Everyone seemed to like the party and Chloe had a blast and in the end that's all that mattered.

For the invitations I made fabric flowers in yellow, white and pink and wrote the party info on leaves.
Sorry this is such a horrible picture these did turned out really cute though.


For decorations I made flower pom poms. I know I use these at a lot of my parties, but this time I tried to make them look more like flowers. You can grab the tutorial for them on {this earlier post}. The only thing I did different was for the centers I used a napkin that was smaller than the tissue paper so they looked more like stamens. I put these up over the dessert table. I also strung them up with paper lanterns I had from Chloe's party last year.


For the dessert table I decided to do a small 6 inch cake along with cupcakes. I know this is just my obsessive compulsion but I wanted the food to match the color scheme too.


 I made a white cake filled with lemon curd, strawberry cream cheese and fresh strawberries and I frosted the cake with white chocolate whipped cream. I added a pink fondant flower mainly because my husband made a comment to me the night before how my flowers were really simple for the party favors. I wasn't sure how I wanted to decorate the cake and I did the desserts the morning of, so I just threw it together last minute. To get the tutorial for the ruffle look go to {this link} and you can watch {this video} for the fondant flower. Since I did the flower the morning of the party, I shaped the petals in an empty egg carton and covered them and let them set up in the fridge so they could harden.


I made cupcakes just in case some of the kids didn't like lemon curd so I just filled theirs with fresh strawberries instead. I made five sets of fabric and paper flowers in the three different colors for the cupcake toppers. Also, I was planning on adding leaves and I think it would've looked a little bit better, but I was simplifying.


For the backdrop of the food table, I made wall flowers out of napkins using the same technique as the pom poms but you can check out {this tutorial} from Made. I combined the wall flowers with a few paper pinwheels (get the tutorial from my {robot party} link) and a couple of fabric flowers.

For the food, I kept it really simple and served brunch this time. My father in law made cinnamon rolls and I made a few quiches. My family came into town for Chloe's party and they helped prep yogurt berry parfaits  (topped with corn flakes which is the Japanese way) and fruit kebabs for me.


I had my mom cut out different melons and pineapple in different flower shapes and attached grapes to look like leaves. For the containers for the fruit, I recycled a few large soup cans and wrapped them in fabric and attached a flower onto them.


I served lemonade for drinks. I bought some really cute pint size canning jars from Walmart and printed out some labels. I also bought pink striped paper straws from Little Yume on Etsy to go with the drinks. My husband was really against me getting the jars and straws since they cost a little extra, but they were a huge hit, and after the party he admitted that it was a good idea (plus I can reuse the jars as gifts or to actually can with later). The grandparents were nostalgic over the paper straws and everyone loved the cute jars.


I did take pictures of the rest of the party decor and party favors but I think they got erased because I can't find them anymore. Oh well. For the rest of the decorations I just hung balloons upside down along with the left over paper lanterns. For party favors, I made lemon ricotta cookies (my family's favorite) and added a small pink fondant flower.

You can check out these different link for different flowers I used for the party.
Organza Flowers by Little Birdie Secret
Lace Flower by See It Again Saturday
T Shirt Flower by A Bit Of Sunshine
Star Flower by The Letter 4
Peony by Ruffles and Stuff
Fabric Flower by Simply Vintagegirl

This was a fun party and it was great to spend time with family to celebrate Chloe turning two.

Saturday, January 14, 2012

Achieving Your Goals


Hi, I’m Hillary, a stay-at-home mom of two, soon to be three boys. Thanks Joyce for the opportunity to be a guest blogger! Joyce suggested I talk a little about goals, which I’m passionate about. This is the perfect time to do so, since we’re all starting fresh with a whole new year before us!


If you’ve already broken your New Year’s resolutions, don’t worry, you can still start over! 

First, pick one realistic goal. Most people have an easy time coming up with things they want to achieve, the hard part is being realistic and having the gumption to keep trying after a failure. If you’re new to goal setting, and especially if you’re new to goal keeping, I suggest you start out with one goal. We all have plenty of areas to work on, but we can’t work on everything. Once you get the knack of truly accomplishing one goal, you can add more.

Second, WRITE IT DOWN! A goal really isn’t a goal if you just keep it in your head. And it must be specific enough that you can measure it and set a date to accomplish it by.

Example:    I want to lose weight. Not specific!
                   Lose 5 pounds. Still not specific enough!
                   Lose 5 pounds by February 14th. Ah, now 
                   there is a specific goal.


Third, write down the ways you plan to accomplish your goal.


                           Lose 5 pounds by February 14th by:
1.       Cutting out all drinks except low-fat milk and water
2.       Running three times a week
3.       Having a piece of fruit or a vegetable before eating any dessert

And Fourth, you need to find a way to remind yourself regularly throughout the time allotted for the goal. You can do this by:

  • Finding a friend or family member to check in with once a week
  • Writing about it on your blog
  • Taping it to your fridge with a check mark system (who doesn’t like checking things off?)
Just some way that keeps you thinking about it throughout the time so you don't forget and then feel discouraged. 


Remember to be realistic! I think that is one of the most important parts of setting goals. I think we all know whether we are truly ready to commit to a goal or not. Otherwise you’ll give up on the goal, and we don’t want that!

And at the end of the goal, find a way to celebrate. I believe the best reward is to share it with someone and say, “I did it!” and let them celebrate with you. Have a dance party with your kids, watch your favorite movie, or take half an hour to relax. You’ve earned it!

I love this quote from President Monson: "Courage is required to make an initial thrust toward one’s coveted goal, but even greater courage is called for when one stumbles and must make a second effort to achieve."

Now what are you waiting for? Start a new goal today!

Saturday, December 24, 2011

DIY Handmade Gifts

This year I did a lot of homemade gifts. My friend Ashley asked me to be a guest blogger and show some of them on her blog. It was really exciting to actually be the guest blogger this time. It was my very first guest appearance and it was really sweet of Ash to ask me. I thought I would share it also here too.

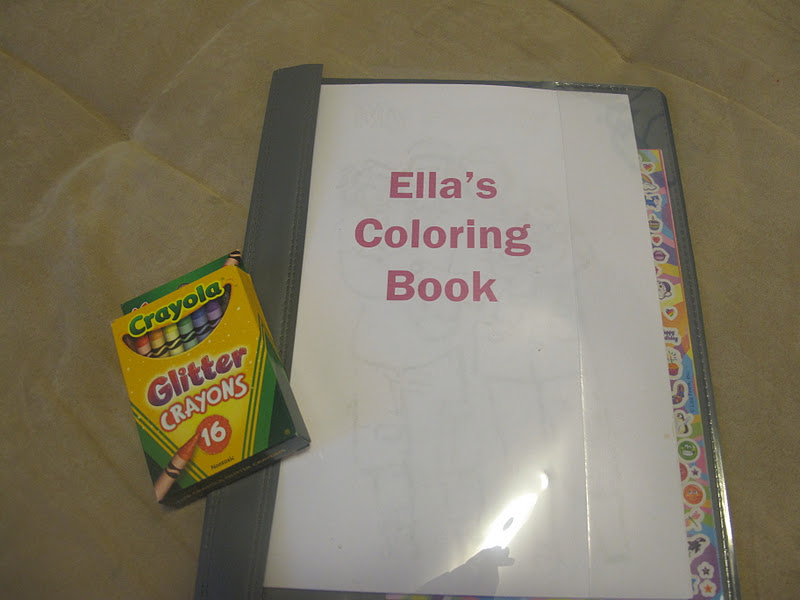
This year, I made my niece her own coloring book. I took pictures of all her family members (including extended) and took it into Photoshop to turn the photos into coloring pages. I just sent it off, so I'm not sure how she likes it yet, but my kids loved it. They thought it was so much fun being able to color their family members. You can get the how to from Photojojo at this link. Also, if you want to do this but don't have Photoshop you can also do at the Crayola website. A few tips if you use Photoshop: use the burn tool to help darken the edges and use the brush tool to create better outlines. I bought a cover for it but I was originally planning on making a cover for it. You can find the tutorial from Angry Chicken here.


This is a page from the coloring book of my adorable niece.

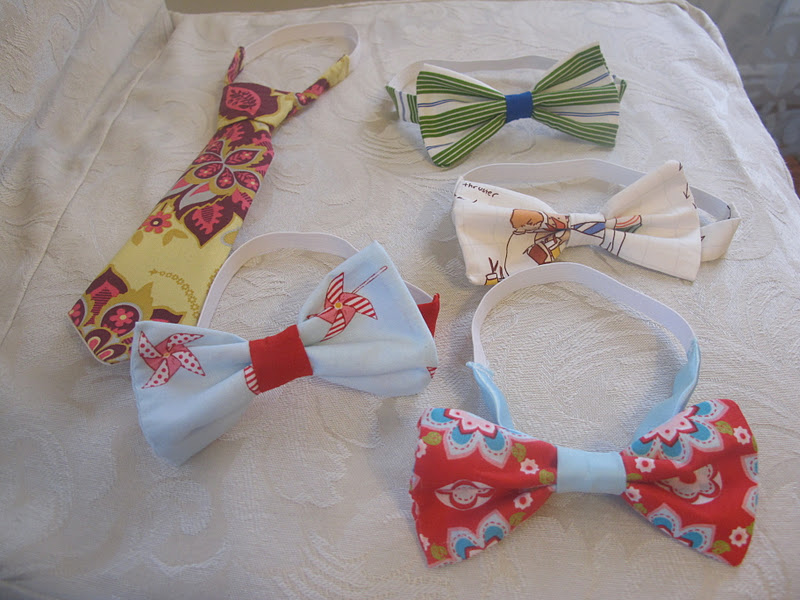
Since I'm always making accessories for Chloe, Elijah gets left out sometimes. To compensate, I make him ties. He loves them. He picked out some fabric and I'm making him some for Christmas. He also loves bow ties. I also made a few bow ties for my nephew this year. For babies I always attach elastic instead of a clip since they normally try to pull at them. This is something my sister in law can do (and has done) but I loved the fabric he chose. For the tie tutorial I used these two tutorials: Purlbee and Sharing the Wealth and for the bow tie I used this link from Prudent Baby.


Chloe loves backpacks right now and I thought I would make her one for Christmas. I looked at this tutorial from Prudent Baby for the drawstring backpack. I haven't finished it but this is the look I'm going for:

* this is from Goodies

I'm always making headbands for Chloe, or flower clips, and I made her this one for Thanksgiving. These make great gifts though and are easy to make and less than $1 to make. I used the tutorial from Mary Jane and Galoshes.


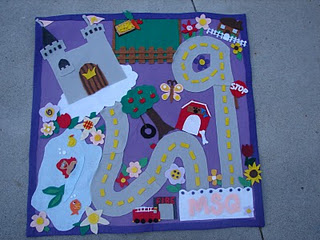
If you're not into sewing try this tutorial from 'A Girl and A Glue Gun' for a car mat. You can see her boy and girl versions. I haven't started this one yet (I might wait for his birthday in February). I thought this was cute and affordable. I also wanted to try a Batman theme since Elijah is really into Batman right now.


If you remember my earlier post that I did for Jed's Christmas gift, here it is. He loves it! He loves getting to open one each day and one of the things he liked the most were outings for him and the kids. He also likes the notes that I have attached to each day. Elijah also loves this. He is so excited to give it to Jed and even gets excited about the date ideas. He wants to come with us. 


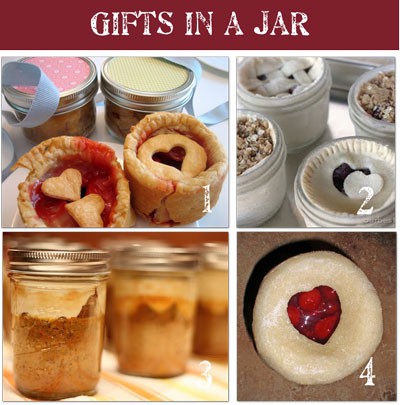
Since I'm also really into baking and I'm loving the mason jar gift ideas right now, I thought these were a cute ideas. I found a bunch on Tip Junkie and Under the Table and Dreaming. I thought these would be really cute to give to neighbors, friends, co workers or for the people I visit teach. Another cute idea is to give hot chocolate with a dessert tasting spoon for a stirrer. My husband's co worker gave us one and it reminded me of these dessert tasting spoons that I once saw. It's such a cute idea and easy and affordable to do.

*image from Tip Junkie


*image from shutterstock

I hope these help you with your own Christmas projects. Merry Christmas!


Christmas Decor

Here's a couple of really easy Christmas decorations you can do.

For the candy cane vase:
Take a vase and wrap a big rubber band around it. Stick candy canes in under the rubber band. Hide the rubber band with ribbon and secure ribbon with double sided tape. (Mine took 4 boxes of candy canes)

I also filled other vases with ornaments I got from the Dollar Store and a candle and placed them around the house.

For the wreath:
You can follow the link I did on this previous post. I then added some ornaments in the center with my hot glue gun and fishing line. 

I also found these cute candy topiaries from BHG


I also made a bunch of paper snowflakes with my kids. They loved it and they both love having them up around the house, especially on their windows where it makes shadows against the blinds. I haven't made these since grade school so I looked up instructions on Martha Stewart.

Thursday, December 15, 2011

Christmas Tree Inspirations

The first Saturday of December, I took the kids along with my sister in law and her kids to the Festival of Trees in SLC. They have such amazing Christmas trees! They're all decorated and sold and the proceeds to go the Shriner's Children's Hospital. It's amazing to see the creativity and how beautiful these trees were. They also had wreaths, quilts and gingerbread houses. Seriously, these people have skill! It also was so touching to see who or why they were donated for.

I thought I would post some pictures in case anyone wanted some inspiration.

 (Chloe's favorite)


 (one of Elijah's favorite)

(I love polar bears!)

(this is a cute theme: What Little Boys Are Made Of)


(another of Elijah's favorites)


Gingerbread houses:


 the next three are all part of the same one, it rotated, it's for all the children around the world


(points for you if you know what this one is without looking at the tag)

Tangled


Wreaths:


(this could be cute for spring too)

And one quilt:
(Elijah wants me to make him this one)